This day in History - October 7th
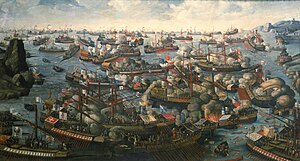
October 7, 1571, Naval Battle of Lepanto
Lepanto, battle of (lipăn'tō) [key], Oct. 7, 1571, naval battle between the Christians and Ottomans fought in the strait between the gulfs of Pátrai and Corinth, off Lepanto (Návpaktos), Greece. The fleet of the Holy League commanded by John of Austria (d. 1578) opposed the Ottoman fleet under Uluç Ali Pasha. The allied fleet (about 200 galleys, not counting smaller ships) consisted mainly of Spanish, Venetian, and papal ships and of vessels sent by a number of Italian states. It carried approximately 30,000 fighting men and was about evenly matched with the Ottoman fleet. The battle ended with the virtual destruction of the Ottoman navy (except 40 galleys, with which Uluç Ali escaped). Approximately 15,000 Turks were slain or captured, some 10,000 Christian galley slaves were liberated, and much booty was taken. The victors, however, lost over 7,000 men. Among the allied wounded was Cervantes, who lost the use of his left arm. Lepanto was the first major Ottoman defeat by the Christian powers, and it ended the myth of Ottoman naval invincibility. It did not, however, affect Ottoman supremacy on the land, and a new Turkish fleet was speedily built by Sokollu, grand vizier of Selim II. Nevertheless, the battle was decisive in the sense that an Ottoman victory probably would have made the Ottoman Empire supreme in the Mediterranean.

The Battle of Lepanto
October 7,1777 Battle of Bemis Heights during the American Revolution
On October 7, Burgoyne determined to launch the delayed attack on the American positions on Bemis Heights.
He initiated this plan with an advance divided into 3 columns and 10 guns, commanded by Brig. Gen. Simon Fraser: Maj. Lord Balcarres commanded light infantry on the right column, von Riedsel's Hessians and Brunswick infantry in the center column, and British grenadiers commanded by Maj. John Dyke Acland on the left column. Maj. ?? Fraser's rangers and 600 Tories and Indians would lead the main force in a wide arc to the west and south. (They would wind up marching too far west and not play a major role in the battle). Burgoyne decided to manuever his columns depending on how the Americans were deployed and how Gates reacted to this movement.
Fraser led his 3 columns out of the entrenchments and advanced about 3/4 mile to the edge of Barber's wheatfield, where they deployed. The American pickets sent word to Gates that the British had advanced and were forming up in the wheatfield. Gates ordered Lincoln's division to move forward and meet the British.
The battle bagan when Acland's artillery and grenadiers on the British left spotted Brig. Gen. Enoch Poor's 800-man brigade in the woods below them and opened fire. Poor's men had formed at the base of a slight elevation. Firing downhill, the artillery fire flew over the heads of Poor's troops. Acland then ordered a bayonet charge, but before they could get started, Poor's men fired a deadly volley at them and launched their own attack. Acland's men were cut to pieces, with Acland being shot in both legs and being captured. At the same time that Poor and Acland were fighting each other, Morgan and Dearborn advanced through the woods and attacked Balcarre's column's flank and rear. One of Burgoyne's couriers was sent to Balcarre with an order to retreat but was killed. Balcarre never received the order to fall back. Balcarre's command quickly collapsed and fled to the rear. Both of the British flanks gave way, exposing Riedesel's column to the advance of Brig. Gen. Ebenezer Learned's brigade.
Hearing the sounds of battle, Arnold rode onto the battlefield just as Learned's brigade began its assault. Arnold took over command and led the men in their assault. Riedelsel's flanks were exposed and eventually had to fall back. Fraser tried to rally his men and form a second line of defense. At a critical moment in the battle, Timothy Murphy (one of Morgan's sharpshooters) was ordered to shoot and kill Fraser. Murphy's first two shots missed but his third shot found its target, mortally wounding Fraser. The pressure from both sides and the front forced the British and Hessian troops to move back to the rear at Freeman's Farm. At Freeman's Farm, they reorganized at two entrenchments known as Balcarre's Redoubt and Breymann's Redoubt, and two fortified cabins in between. The fight near Mill's Creek had lasted about 1 hour. Arnold realized that an opportunity now existed to follow up the British defeat with a decisive battlefield victory.
The second part of the battle began with Arnold leading his troops to the British breastworks. At Balcarres' Redoubt, the Americans made their way through the abatis but was driven back. At this time, Learned's brigade arrived on the scene and Arnold them to clear the reinforced cabins between the redoubts. This exposed the southern (left) flank of Breymann's Redoubt. They soon worked their way around the British flanks and took the fort from the rear. Next, they headed to Breymann's Redoubt.
As Arnold was organizing an assault, he was shot in the leg. The Hessians held out as long as they could. The redoubt was not built to withstand repeated and overpowering assaults from several directions. The Hessians was finally forced to surrender as darkness was falling. Burgoyne withdrew his force, leaving the sick and wounded on the field.
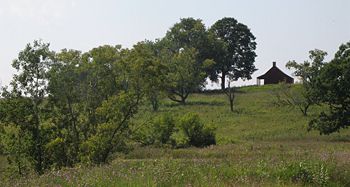
October 7, 1780, Battle of King's Mountain, during the American Revolution
The Over Mountain Men moved south in search of Major Patrick Ferguson. On October 6, while camped at Cowpens, South Carolina, the Over Mountain Men were joined by Colonel James Williams and 400 South Carolinians. From a Rebel spy they now learned that Ferguson was thirty miles to the north, camped at King's Mountain. The colonels wanted to catch up with Ferguson before he reached Charlotte and Lt. General Charles Cornwallis' protection, so they chose 900 of the best men and horses and quickly made their way north overnight.
The combined force of Over Mountain Men under the temporary command of Colonel William Campbell arrived at King's Mountain on the afternoon of October 7, 1780. Major Ferguson had chosen the position because he felt that no enemy could fire upon his position without showing themselves. The Patriot force deliberated and decided to surround the mountain and using continuous fire to slowly close in like an inescapable noose.
The force was divided into four columns. Colonel Isaac Shelby and Colonel Campbell led the interior columns, with Shelby on the left and Campbell on the right. The right flanking column was led by Colonel John Sevier. The left flanking column was led by Colonel Benjamin Cleveland. They moved into their respective positions and began moving toward the summit and Major Ferguson's position. The battle commenced at 3 o'clock with the middle two columns exchanging fire with Major Ferguson for fifteen minutes while the flanking columns moved into position. Ferguson used his Provincial Corps to drive back Colonels Shelby and Campbell with a bayonet charge, but then the Corps had to fall back under sharpshooter fire. Another bayonet charge repelled Shelby and Campbell.
Because of their exposed position, Major Ferguson's men were being overwhelmed. The sharpshooters were picking them off from behind the trees and brush that surrounded the summit, while their own aim was high as they shot downhill. The Over Mountain Men then gained a foothold on the summit, driving back the Loyalists. The net was now quickly closing in. Major Ferguson finally attempted to cut a path through the Patriot line so that his forces could escape, but this failed as Ferguson fell from his horse, riddled with bullets. Ferguson's second-in-command quickly raised the white flag of surrender. Following the request of surrender, it took a while for the firing to dissipate, with cries of 'Remember Waxhaws' and 'Buford's Quarter' spurring some men to continue for a time.


0 Comments:
Post a Comment
<< Home